Celebrate Pi Day with a Spectacular Clear Pie
The Starving Chef is supported by Hungry People like you. When you make a purchase through an affiliate link on my site, I may earn a little bit of cash on the side (at no extra cost to you) to help keep my kitchen running. Read our disclosures here.
What’s Up, Hungry People
Recently, I stumbled upon a sight during my never-ending scroll through the abyss of the internet—a slice of pie so clear, I could see right through it. At first glance, I was convinced it had to be the work of some sophisticated AI, given my default skepticism towards pretty much everything online these days. But upon closer inspection and a bit of detective work on the web, I was astonished to find out that this crystal-clear dessert wasn’t a figment of digital imagination but a bona fide, real-life pie.
The concept of clear pie isn’t new; it’s been a quirky culinary challenge for years. From lemon meringue to pumpkin, traditional pies have been transformed into transparent wonders, leaving only the crust and perhaps a dollop of whipped cream or meringue visibly perched on top.

Every few years, the clear-as-pie phenomenon resurfaces in the foodie community, capturing the imagination of bakers and dessert lovers alike. This year, I decided it was high time I joined the ranks of those daring enough to give this transparent treat a whirl.
Let’s dive into how you can bring this intriguing dish to your own table, just in time for Pi Day. It’s not just a visual spectacle; it’s a conversation starter that’s sure to mystify and delight your guests. So, gear up, Hungry People, as we embark on this clear culinary adventure, perfect for celebrating the mathematical marvel that is Pi Day with a twist that’s as intriguing as it is edible.
Here’s What You Need
- Flour: Provides structure and stability to the pie crust.
- Butter: Adds flakiness and rich flavor to the crust.
- Water: Binds the dough and helps it come together.
- Egg: Enriches the dough, adding color and flavor.
- Sugar: Sweetens the crust and helps with browning.
- Salt: Enhances the overall flavor of the crust and filling.
- Egg Whites: The base for meringues, providing structure and volume.
- Vanilla Extract: Adds a sweet, aromatic flavor to the meringues.
- Gelatin: Thickens the lemon filling, creating the clear effect.
- Citric Acid: Adds tartness, enhancing the lemon flavor in the filling.
- Lemon Juice: Provides the acidic, bright flavor characteristic of the filling.
Let’s Cook!
First things first, we’re kicking things off with the crust because, well, every great pie needs a solid start. Grab your food processor, and let’s pulse together super cold butter and flour until crumbly. Next up, toss in the sugar, salt, and egg to join the party, giving everything another quick pulse. Now, while everything’s mixing, slowly add in the water until the dough decides it’s time to come together and form a ball.
Transfer your dough to a floured surface, give it a little rest under a cozy blanket (just kidding, a simple damp towel will do) for about 30 minutes. After its nap, roll it out nice and even, about 1/8th inch thick should do the trick, and gently lay it over your pie pan. Remember, we’re not pressing it down—let it naturally slump into the pan to avoid shrinkage. Give it a few pokes with a fork, chill it, and then it’s time for its blind bake debut. Line it with parchment, fill it with weights (or whatever you’ve got), and bake for 10 minutes. Remove the weights, brush with our egg wash, and give it another 5-8 minutes in the oven. You can do this up to 4 days ahead if you’re a planner (I am not).
The Fluffy Meringue
Moving on to the meringues, these little clouds of joy are simpler than they sound. In a stand mixer, whip up those egg whites until they’re frothy. Add vanilla and a pinch of salt, then gradually introduce the sugar while you keep whipping until stiff peaks form. Preheat your oven to a cozy 250°F, line a baking sheet, and pipe those meringues into whatever shapes or sizes you fancy. Bake for 90 minutes without peeking, then let them cool down in the oven.
Lemon Filling: The Clear Star
Now, the main event—the lemon filling. Start by playing matchmaker with the gelatin and water, letting them get acquainted until the gelatin blooms. In a pot, heat water and sugar just until the sugar dissolves, then add your gelatin mix until everything’s smooth. Stir in the lemon juice and citric acid, then let the mix cool to room temperature.
Putting It All Together
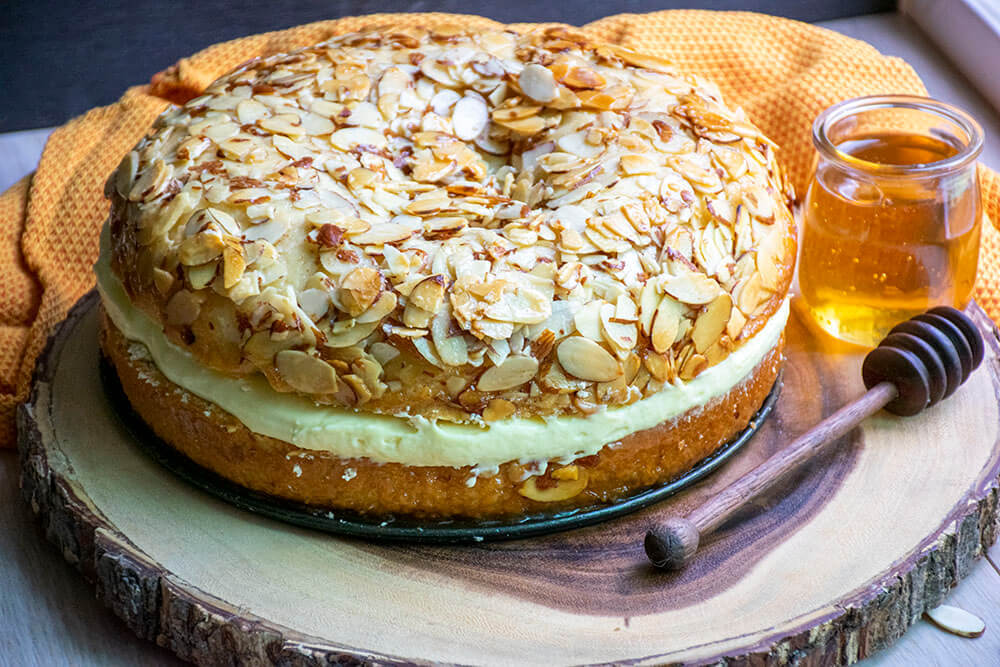
With the pie crust baked and cooled, pour your lemon filling into the crust (still in the fridge for maximum levelness) and let it set for about 8-10 hours. Patience is key here, Hungry People. Right before you’re ready to serve, crown your pie with those meringue clouds. Remember, timing is everything—don’t let those meringues sit on the pie for too long, or they’ll turn into a weepy mess.
Clear Pie Mastery Tips
- Achieving the Perfect Pie Crust: Ensure your butter is very cold and handle the dough as little as possible to maintain a flaky texture. If the dough becomes too warm during preparation, refrigerate it for a few minutes before proceeding.
- Blind Baking Success: To prevent a soggy bottom, make sure to blind bake your crust with weights. This step is crucial for getting that perfectly baked foundation that won’t turn mushy once the filling is added.
- Homemade Pie Crust is KEY: Store-bought, premade pie crusts will not give you the same results as a crispy homemade crust. Premade is more likely to cause issues and float rather than behave as needed for a pie crust.
- Meringue Making: For the fluffiest meringues, ensure your mixing bowl and whisk are completely grease-free and the egg whites are at room temperature. This helps achieve maximum volume.
- Working with Gelatin: To prevent lumps, sprinkle the gelatin evenly over the water and let it sit for a few minutes before heating. If any lumps remain, strain the mixture before adding it to the rest of the ingredients.
- Lemon Filling Clarity: For a crystal-clear filling, avoid stirring the mixture too vigorously once it’s combined with gelatin. Excessive agitation can introduce air bubbles, which detract from the clear appearance.
- Serving Suggestions: Serve the pie the same day it’s assembled with the meringues for best texture and appearance. Meringues can soften and lose their crispness if left too long in a moist environment.
- Troubleshooting a Runny Filling: If the filling doesn’t set properly, it might be due to insufficient gelatin or not allowing it to chill long enough. Ensure it chills for at least 8-10 hours.
And there you have it, Hungry People—a clear pie that’s as fun to make as it is to eat. Who knew that a bit of kitchen science and a dash of creativity could lead to a dessert that’s not just a feast for the tastebuds but also a visual wonder? This Pi Day, or honestly, any day you’re feeling a bit adventurous, whip out this recipe and prepare to dazzle everyone—not just with your baking skills but with a pie that defies expectations.
Remember, the best part of cooking is the joy of experimentation and the surprises along the way. So, go ahead, give it a try, and let’s keep making magic in the kitchen. Enjoy, and until next time, keep those ovens preheated.
Clear Pie Recipe for Pi Day Fun
Equipment
- cutting boards
- pie pans
- piping bag or plastic baggie + icing tip
- parchment or silicone mat
Ingredients
For Pie Crust:
For Lemon Filling:
- 3 cups water
- 2 cups sugar
- 2 packets gelatin
- 2 tablespoons citric acid
- 1 lemon juiced & strained (can sub in lime or any comparable citrus flavor)
Instructions
For Pie Crusts
- Use a food processor to pulse together the butter and flour. Add the sugar, salt, and egg. Pulse again to combine. Then, with the food processor running on medium speed, slowly pour in the water. Pulse until a dough ball just starts to come together.
- Tip the dough out onto a flour-dusted surface. Cover and rest the dough ball for 30 minutes.
- After the dough has rested, roll it out into a circle until the dough is an even thickness (about 1/8th inch thick).
- Drape the crust over the pie pan. Do not press the dough into the edges but rather let it slump into the pan naturally (pressing will cause the crust to shrink). Prick the bottom and sides of the crust with a fork, then chill until ready to fill.
- Blind bake the pie crusts: line the pan with parchment and add baking weights (or rice, lentils, etc.) to blind bake for 10 minutes. Then remove the weights, brush with egg wash, and finish baking the crust for 5-8 more minutes. The crust can be made up to 4 days in advance.
For the Meringues:
- In the bowl of a stand mixer with the whisk attachment, beat the egg whites until frothy. Add the vanilla extract and salt. Slowly pour in the sugar in a continuous stream while whipping. Continue to whip until stiff peaks form and the sugar is dissolved.
- Preheat the oven to 250°F. Line a baking sheet with parchment or a silicone mat. Transfer the meringue to a piping bag with your desired tip shape. Pipe out 10-20 meringues in similar shapes and sizes.
- Bake the meringues for 90 minutes – do not open the oven door. When finished, turn off the heat but keep the door closed until cooled completely.
- Once cooled, gently peel the meringues off the parchment and store in an airtight container for up to 4 days in advance.
For the Pie Filling:
- In a small bowl, whisk together 1/4 cup water with the gelatin packets. Allow the gelatin to bloom for 5-10 minutes.
- In a large pot over medium-high heat, whisk together the water and sugar. Heat until the sugar is just dissolved and the liquid is steaming. Add the bloomed gelatin to the pot. Stir to combine and melt the gelatin. If the gelatin doesn't melt right away, increase the heat until it melts.
- Stir in the lemon juice and citric acid. Allow the liquid to cool until it is nearly room temperature and has not started setting (about 30 minutes). If your house is cold, this may take a shorter time to set. If it starts to set, just reheat and wait again to cool. The liquid should be a pourable consistency.
Assembling:
- While the liquid cools, blind bake the pie crusts if you haven't already, then cool completely.
- Place the pie crust in the fridge in a spot where it is as level as possible. Pour the filling into the baked pie crust while the crust is in the fridge. It should fill up to the top.
- Chill for 8-10 hours or until the pie filling is completely set.
- Just prior to serving, place the meringues on top of the pie as desired. Do not decorate more than an hour or so ahead of serving, or else the meringue will melt into the pie filling. Serve chilled and enjoy!